Java programming language
Basic client-server communications
Some advanced concepts about sockets


1. Object serialization in sockets
When we talk about serializing an object, we mean converting the state of that object into a byte sequence so that it can be stored or transmitted and later reconstructed. In Java, objects that are serialized with the standard object-serialization mechanism must implement the Serializable interface. If an object contains references to other objects, those referenced objects must also be serializable unless the corresponding fields are marked as transient.
Primitive values such as int, char or double are not objects and do not implement Serializable, but ObjectOutputStream and ObjectInputStream can also write and read primitive values directly.
Security note: Java native deserialization must only be used with data from a trusted source. Deserializing data supplied by an unknown or untrusted peer can be dangerous because the incoming stream determines which objects are created. In real applications, use an explicit data format such as JSON, XML, CBOR or Protocol Buffers when appropriate, or apply strict
ObjectInputFilterrules before callingreadObject().
1.1. Sharing classes and objects between server and client
The classes whose objects are serialized must be available to both client and server, and both sides must use compatible versions of those classes.
A clean solution is to create a separate model module or library containing the shared classes and add it as a dependency of both the client and server projects. If client and server are modules inside the same IntelliJ IDEA project, this can be configured from Project Structure > Modules > Dependencies. If they are separate projects, the model can be packaged as a JAR or included through the build system used by the projects.

A serializable class should normally declare a serialVersionUID. This value identifies the serialized version of the class and helps detect incompatible changes:
import java.io.Serializable;

public class User implements Serializable {
    private static final long serialVersionUID = 1L;

    // Attributes, constructors, getters and setters...
}
1.2. Serialization through TCP sockets
Given a TCP socket, we can create an ObjectOutputStream and send an object through it:
ObjectOutputStream objOut =
    new ObjectOutputStream(socket.getOutputStream());
objOut.writeObject(myObject);
objOut.flush();
In the same way, we can create an ObjectInputStream and read an object from the socket:
ObjectInputStream objIn =
    new ObjectInputStream(socket.getInputStream());
MyObject obj = (MyObject) objIn.readObject();
readObject() may throw ClassNotFoundException if the receiving side does not have the class required to reconstruct the received object.
There is also an important implementation detail: the constructor of ObjectInputStream waits for the serialization-stream header. Therefore, if both sides create an ObjectInputStream first, they may block waiting for each other. A simple convention is to create and flush the ObjectOutputStream first, and then create the ObjectInputStream on both sides:
ObjectOutputStream objOut =
    new ObjectOutputStream(socket.getOutputStream());
objOut.flush();

ObjectInputStream objIn =
    new ObjectInputStream(socket.getInputStream());
For classroom exercises where both applications are under our control, this is enough to understand the mechanism. For software that accepts data from untrusted peers, an ObjectInputFilter should be configured before reading objects so that unexpected classes, excessive object graphs or oversized data can be rejected. For example, after creating the ObjectInputStream and before calling readObject():
ObjectInputFilter filter = ObjectInputFilter.Config.createFilter(
    "maxdepth=10;maxrefs=100;maxbytes=10000;" +
    "com.example.model.*;java.base/*;!*"
);
objIn.setObjectInputFilter(filter);
This example limits the size and complexity of the object graph, allows classes from the sample model package and from the java.base module, and rejects other classes. The package and limits must be adapted to the application. Remember to import java.io.ObjectInputFilter.
Exercise 1:
Create a serialization application with the following projects:
- Create a project called UserData_Model, and define a serializable
Userclass inside it. The class must contain a login, a sample password (bothString) and the registration date, together with appropriate constructors, getters and setters. Declare aserialVersionUID. The constructor must leave login and password empty (""), and the registration date must be automatically filled with the current date.- Create a server project called UserData_Server. When a client connects, the server will create a new
User, send it to the client and wait for a response.- Create a client project called UserData_Client. It will connect to the server, receive the
Userobject, ask the user to fill in the login and sample password, and then send the updated object back to the server.- When the server receives the completed
Userobject, it will print its information in the server console.- Create and flush the
ObjectOutputStreambefore creating theObjectInputStreamon both sides.This exercise is intended to practise serialization. Never use a real password in this example. If credentials were sent in a real application, the connection would also need appropriate security mechanisms such as TLS.
1.3. Serialization through UDP sockets
UDP sends independent datagrams rather than a continuous byte stream. Therefore, if we want to send a serializable object in a datagram, we first serialize it into a byte array.
To serialize an object into a byte array:
byte[] bytes;

try (ByteArrayOutputStream bs = new ByteArrayOutputStream();
     ObjectOutputStream objOut = new ObjectOutputStream(bs)) {

    objOut.writeObject(myObject);
    objOut.flush();
    bytes = bs.toByteArray();
}

// Now bytes can be used as the payload of a DatagramPacket.
When receiving the datagram, we must use only the bytes actually received. The internal buffer of a DatagramPacket may be larger than the received message:
byte[] buffer = new byte[4096];
DatagramPacket packet = new DatagramPacket(buffer, buffer.length);
socket.receive(packet);

try (ByteArrayInputStream bis = new ByteArrayInputStream(
         packet.getData(), packet.getOffset(), packet.getLength());
     ObjectInputStream objIn = new ObjectInputStream(bis)) {

    MyObject obj = (MyObject) objIn.readObject();
}
As with TCP, native Java deserialization should only be used with trusted data or with an appropriate ObjectInputFilter.
Also remember that a UDP datagram has a limited size and large datagrams may be fragmented by the network. Object serialization over UDP is therefore suitable only for small classroom examples. For large or important data transfers, TCP or a higher-level protocol is normally a better choice.
Exercise 2:
In this exercise we are going to simulate a simplified auction using UDP. Store the information about the product in a serializable
Productclass in a separate model project. The attributes will be the product name, buyer’s name and product price. Initially, the server will create aProductcontaining the product name and an initial auction price, while the buyer’s name will be empty.Remember that UDP has no connection-establishment phase. Therefore, define this simple application protocol:
- The server starts on a known UDP port and creates a product such as
"Game console", with an initial price of 100 euros.- Each client sends a small UTF-8 datagram containing
JOINto the server.- The server receives 3
JOINdatagrams and stores the IP address and port obtained from each receivedDatagramPacket.- The server serializes the
Productobject and sends it in a UDP datagram to each registered client. Each client deserializes the object and sees:Product name: Game console Product initial price: 100 euros
- Each client asks the user for a name and an offer, for example:
nacho 150
arturo 170
ana 120
The client sends this information back to the server. You may define a second serializable class such as
Bid, or use a simple UTF-8 text format for the offer.
- The server receives the 3 offers, selects the highest one, updates the
Productobject with the final price and buyer’s name, serializes it again and sends the updated object to the three stored client addresses. The clients will finally see:Final price: 170 euros Buyer's name: arturoCall the projects Auction_Model, Auction_Server and Auction_Client. You can add any additional class or method that you need. Use only the bytes actually received from each datagram when deserializing data.
Since UDP does not guarantee delivery, this exercise is a simplified classroom example. You do not need to implement retransmissions, acknowledgements or recovery from lost datagrams unless your teacher asks you to do so.
2. Multicast sockets
Multicast allows one datagram to be delivered to the members of a multicast group. It is useful when the same information must be distributed to several receivers without sending a separate copy to each one.
IPv4 multicast addresses occupy the range 224.0.0.0 to 239.255.255.255. The block 224.0.0.0/24 is reserved for local network control protocols and should not be chosen for our own application groups. For private classroom or local-network examples, addresses from the administratively scoped range 239.0.0.0/8 are more appropriate. In the examples below we will use 239.255.0.1.
Multicast communication uses UDP, so it does not establish a connection with each receiver and does not guarantee delivery, ordering or duplicate suppression.
2.1. Joining and leaving a multicast group
Older Java examples often use these methods:
ms.joinGroup(groupAddr);
ms.leaveGroup(groupAddr);
These overloads have been deprecated since Java 14 because they do not explicitly indicate the network interface. Modern code should use joinGroup(SocketAddress, NetworkInterface) and leaveGroup(SocketAddress, NetworkInterface).
A basic example is:
import java.net.DatagramPacket;
import java.net.InetAddress;
import java.net.InetSocketAddress;
import java.net.MulticastSocket;
import java.net.NetworkInterface;
import java.nio.charset.StandardCharsets;

int groupPort = 6000;
InetAddress groupAddress = InetAddress.getByName("239.255.0.1");
InetSocketAddress group =
    new InetSocketAddress(groupAddress, groupPort);

// Choose the network interface that will be used for multicast.
// Replace the interface selection if your computer has several interfaces.
NetworkInterface networkInterface =
    NetworkInterface.getByInetAddress(InetAddress.getLocalHost());

if (networkInterface == null || !networkInterface.isUp()
        || !networkInterface.supportsMulticast()) {
    throw new IllegalStateException(
        "No suitable multicast network interface was found");
}

try (MulticastSocket ms = new MulticastSocket(groupPort)) {
    ms.joinGroup(group, networkInterface);

    // Receive a message
    byte[] buffer = new byte[1024];
    DatagramPacket packetR =
        new DatagramPacket(buffer, buffer.length);
    ms.receive(packetR);

    String received = new String(
        packetR.getData(),
        packetR.getOffset(),
        packetR.getLength(),
        StandardCharsets.UTF_8
    );

    // Send a message to the whole group
    String message = "Welcome to this group";
    byte[] data = message.getBytes(StandardCharsets.UTF_8);
    DatagramPacket packetS = new DatagramPacket(
        data, data.length, groupAddress, groupPort);
    ms.send(packetS);

    ms.leaveGroup(group, networkInterface);
}
The example uses packetR.getOffset() and packetR.getLength() so that only the bytes actually received are converted into text.
If your computer has several network interfaces (for instance, Ethernet, Wi-Fi, VPN and virtual-machine adapters),
InetAddress.getLocalHost()may not select the interface that you want. In that case, inspect the available interfaces and choose the appropriate one explicitly withNetworkInterface.getByName(...)orNetworkInterface.getByInetAddress(...).
2.2. Multicast communication models
There is not necessarily a permanent “server connection” in multicast. All members join the same group and datagrams addressed to the group can be received by its members.
Two common scenarios are:
- One sender and many receivers: one application sends announcements, sensor information or messages to the group, while several clients only receive them.
- Peer group: every participant can both send to and receive from the multicast group. A simple group chat is an example of this model, so a dedicated server is not strictly necessary.
Because multicast is based on UDP, applications that need acknowledgements, retransmissions, strict ordering or guaranteed delivery must implement those mechanisms themselves or use another protocol.
2.3. Troubleshooting multicast
Multicast depends on the operating system, network interface, firewall and network infrastructure. If an example does not work, check the following before changing the program logic:
- Verify that all applications use the same multicast address and port.
- Verify that the selected
NetworkInterfaceis up and supports multicast. - Check the operating-system firewall for the UDP port used by the application.
- If testing on different computers, check that the network infrastructure permits multicast traffic between them. Some Wi-Fi networks, VPNs, containers and virtual-machine networks restrict multicast.
- On a dual-stack system where IPv4 multicast causes a specific compatibility problem, the JVM option
-Djava.net.preferIPv4Stack=truecan sometimes be useful for testing, but it should not be the first or only troubleshooting step.
Exercise 3:
Create a multicast application with the following projects:
- A project called MulticastMessage_Server that asks the user to enter messages from the keyboard and sends them to the multicast group. The process will finish when the user types
"finish".- A project called MulticastMessage_Client that joins the same multicast group and prints every received message in the console.
- Use the modern
joinGroup(SocketAddress, NetworkInterface)andleaveGroup(SocketAddress, NetworkInterface)methods.- Use UTF-8 explicitly and process only the number of bytes actually received in each datagram.
- Test first on one computer and then, if possible, on two computers connected to the same local network.
Exercise 4:
Create a multicast application that implements a group chat. In this case, we will not need a dedicated server. Create a JavaFX application called MulticastChat with the following appearance:
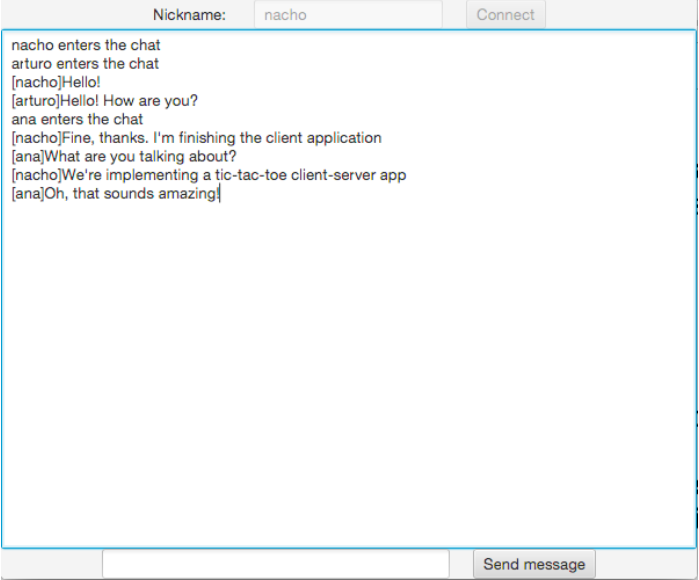
At the beginning, ask the user to enter a nickname and then join the multicast group. Once connected, the user will be able to send messages using the lower text field. Every message sent to the group must be displayed in the main text area. When the window closes, the application must leave the group and close the socket.
The call to
receive()is blocking, so it must not run on the JavaFX Application Thread. Receive datagrams in a backgroundThread,TaskorService, and update the graphical interface safely, for example withPlatform.runLater(...).Add enough diagnostic output or logging to identify at least the selected network interface, multicast address and multicast port. This information will also help you debug the application if communication fails.
3. Final considerations
When choosing a communication mechanism, consider the needs of the application rather than selecting a socket type only because it is easier to program:
- Use TCP when reliable, ordered delivery and a connection between peers are required.
- Use UDP when independent datagrams and low overhead are appropriate and occasional loss can be tolerated or handled by the application.
- Use multicast UDP when the same datagram must be delivered efficiently to a group of receivers on networks that support multicast.
- Use TLS over TCP when confidentiality, integrity and peer authentication are required.
- Use Java native serialization only in controlled environments where both sides are trusted and the serialized classes are known. For data received from untrusted sources, prefer explicit data formats or apply strict deserialization filters.
In all cases, document the communication protocol used by the application: addresses and ports, transport protocol, message or object format, expected message sequence, termination conditions and relevant error handling.