Java programming language
Object oriented programming
Managing complex projects in IntelliJ
Now that you have learnt what a class is and the main relationships that we can establish between classes, you may think that a real life project will usually consist of several classes, with their corresponding source files… and you are right.
As soon as our Java application has more than one class, then simple IDEs such as Geany can have some problems to deal with all the classes: whenever we compile a class, we need to take into account the rest of the classes related with it, and this can be a tough job.
Fortunately, advanced IDEs such as IntelliJ, Eclipse or NetBeans (among others) lets us handle complex projects easily. We just need to create a new project from those IDEs (typically a new Java project), and choose the project name.
1. Project management in IntelliJ
Regarding IntelliJ, here you can find a quick overview on how to install it and create your first projects. In this section we are going to go deeply into how to use this IDE to develop projects easily.
1.1. Arranging classes in packages
Packages are a way to arrange our classes in a project or library, so that each one (or a group of them) belongs to a given package. In other programming languages, such as C#, packages are called namespaces, but the purpose of these terms is equivalent.
A package name consists of one or more words, separated by points. Each point establishes a new package sublevel. So, if we define the package javatest, then this is a first level package, but if we define a package called mypackage.utils, then there is a first level package called mypackage, and inside this package there is a second level package called utils.
Whenever we create a package in Java, a new folder is physically created in the hard drive, with the same name than the package. If the package has more than one word (more than one level), then every subpackage will have its own subfolder. According to previous example, if we define mypackage.utils package, then a folder called mypackage will be created, and then a subfolder called utils inside mypackage will be created as well.
We can add packages to our IntelliJ project by right clicking on the src folder, where all our source code will be placed. Then, we choose New > Package context menu, and specify the package name:

1.2. Adding classes and elements
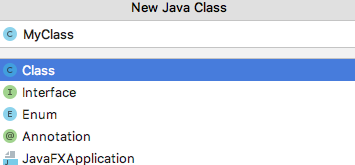
We can add classes to a package by right clicking on the package name and choosing New > Java Class context menu. Then, a dialog will be shown to specify the class name and type (by default, IntelliJ considers that it will be a class, but it can also be an interface, or a JavaFX application, among other options).

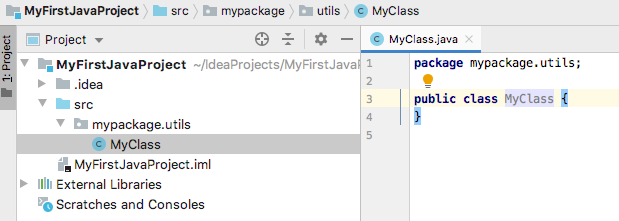
Finally the new class will be visible in the Project panel on the left, and we can edit it in the code editor:

It is important to always assign a class to a package. Otherwise, they will belong to a default package and it may be difficult to find it in order to compile it with the rest of classes.
2. Code generation
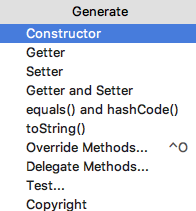
If we use IDEs such as IntelliJ or other similar ones, they can help us add some code automatically to our classes. For instance, if we define the class name and its instance variables or attributes, we can auto-generate the constructor(s), or the getters and setters, or override some methods from parent class, if we want to. Regarding IntelliJ, we need to choose Code > Generate option from the upper menu. Then, we can choose which piece of code we want to generate: a constructor, getters and setters… and then, we can even choose which attributes are involved in this constructor, getter/setter and so on.

Exercise 1:
Create a new Java Project in IntelliJ called VideoGames and place the code of Exercise 5 of previous document in this project, separating each class in its own source file, and following these rules:
- Create a package called
videogames.mainfor the main class- Create a package called
videogames.datafor VideoGame, Company and PCVideoGame classes
For the following exercises, you have to keep in mind the class diagrams proposed in the exercises of this document.
Exercise 2:
Create a new Java Project in IntelliJ called Ships, and write the code to represent the class diagram defined in the Exercise 1 of the specified document.
Exercise 3:
Create a new Java Project in IntelliJ called VideoGameCharacters, and write the code to represent the class diagram defined in the Exercise 2 of the specified document.
Exercise 4:
Create a new Java Project in IntelliJ called Blog, and write the code to represent the class diagram defined in the Exercise 3 of the specified document.
Exercise 5:
Create a new Java Project in IntelliJ called CulturalOrganization, and write the code to represent the class diagram defined in the Exercise 4 of the specified document.